Thanksgiving has always been a favorite of mine because I love all the amazing homemade dishes.
However, last year I had to stop eating gluten due to an intense intolerance. Getting by during the holiday without the apparent staple is really difficult, so for anyone looking for recipes or to simply try something new, I have some fantastic recipes for you that I promise will bring joy back into Thanksgiving food.
The first recipe is for gluten-free stuffing. I have always loved “dressing” as we call it in my house and so I knew I had to find a replacement immediately. The results are wonderful.
Ingredients:
1 (14-ounce) loaf of gluten-free sandwich bread cut into medium-sized cubes
Two large eggs whisked
One tablespoon of olive oil
1 cup diced celery
½ teaspoon minced garlic
2 cups gluten-free chicken broth
One teaspoon salt
One tablespoon of onion powder
One tablespoon thyme
One tablespoon sage
One teaspoon rosemary
Instructions:
- Preheat the oven to 350°F and spray a 2.5-quart casserole dish with gluten-free cooking spray.
- Cut the gluten-free sandwich bread into medium-sized cubes.
- Add olive oil, celery, and minced garlic to a medium skillet and saute over medium/high heat until soft, about 6-8 minutes.
- Add spices to a small bowl and stir to combine.
- Add bread pieces to a large bowl.
- Pour the seasoning blend and whisked eggs over the bread and stir.
- Add sauteed celery and garlic to the bread mixture and stir.
- Pour the gluten-free chicken broth over the bread and gently mix until the bread is evenly moistened.
- Pour the stuffing mixture into the greased casserole dish.
- Bake on the middle rack for 40-50 minutes until the top of the stuffing is golden brown and lightly crisp. Please watch your ovens because all ovens are different.
- Keep any leftovers in an air-tight container and refrigerate.
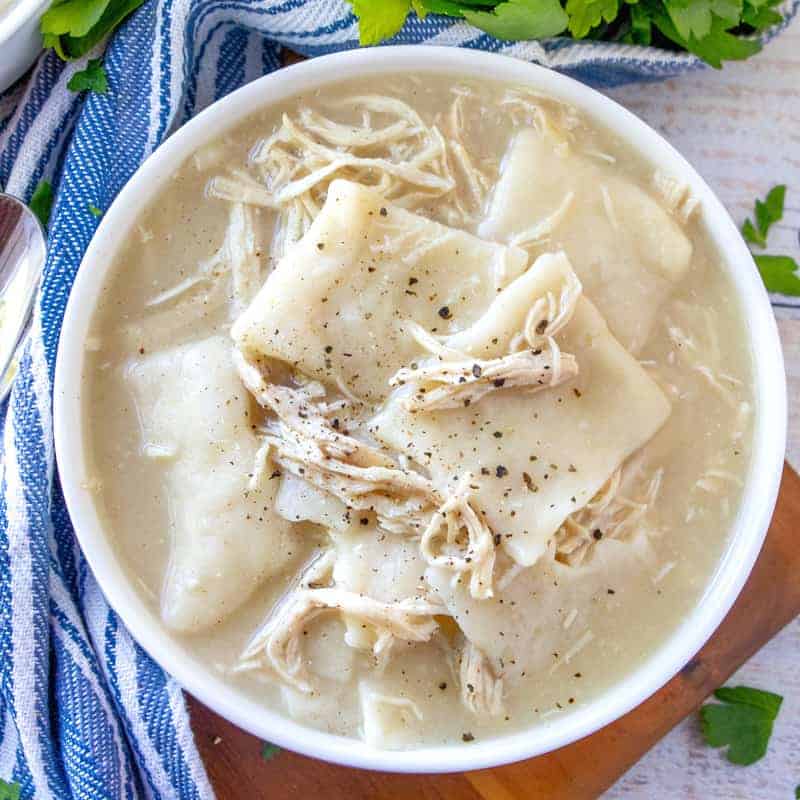
The following recipe is gluten-free chicken and dumplings which happens to be my favorite. My family can not taste the difference in these compared to the original and are a must for Thanksgiving.
Ingredients:
One bone-in chicken breast
3-4 legs
3 cups Bob’s Redmill Gluten Biscuit and Baking Mix
Additional flour to dust surfaces
1 cup low or no-sodium chicken stock
2 cups water
Additional water as needed
Salt and pepper
Instructions:
- Bring a large pot of water to a boil, then drop in chicken breast and legs. Be sure the water covers them. Return to a boil for one hour, occasionally adding more water to cover the meat.
- Remove chicken from the pot and set aside to cool.
- Add broth from the pot you just boiled the chicken into the measured flour until you have a doughy but not sticky consistency. Refrain from mixing too much! They will get tough. Add more flour if you add too much water.
- Dust a clean counter or large cutting board with flour. Dust your rolling pin with flour. Break the dough into two sections and dust the outsides of each with a bit of flour. Roll out one ball of dough at a time. You want noodles about 1/4 inch thick or double the thickness of an egg noodle. Make sure not to make them too thick! After you have them rolled out, cut the dough into 1″x2″ pieces.
- Bring the remaining chicken broth water from earlier to a boil after adding 1 cup of chicken broth and 2 cups of water. This should fill a large stockpot a little less than halfway full.
- When the water is boiling, add in dumplings. Make sure to add them in one at a time, occasionally stirring the pot, so they do not stick together. Add the remaining flour from your dusting surface to the pot. Add salt and pepper. Bring back up to a boil.
- After adding all the dumplings to the pot and bringing it back to a boil, turn the heat down to medium-low and cover. Simmer for 45 minutes to 1 hour. The dumplings are done when you cut one in half and are cooked all the way through. When they are done, they will be a little less fluffy, more noodle-like, and not dusty looking anymore. If you made your noodles too thick or needed to have them simmering on high enough heat, cook them longer/hotter until they are cooked through.
- While your noodles are simmering, pull your cooled chicken off the bones and shred the meat. Place this aside for later.
- If the dumpling sauce gets too thick, add a little more water. It should be like gravy.
- When the noodles are COMPLETELY done cooking, add in your chicken. The chicken will get tough or fall apart if you add it too soon. Just leave it in there long enough to warm up and serve
The last recipe is for gluten-free pumpkin pie. Pumpkin pie is a Thanksgiving staple and is hard to be without. Enjoy this pumpkin pie recipe that I have grown to love.
Ingredients:
Crust:
2 cups crushed gluten-free Cinnamon Chex cereal, or your favorite flavor of gluten-free Chex
1 cup gluten-free Bisquick
½ cup unsalted butter
Three tablespoons of ice water
gluten-free cooking spray
Pumpkin Filling:
1 15 oz. can of pumpkin, not pumpkin pie filling
Two large eggs
1 12 oz. can of evaporated milk
¾ cup sugar
One tablespoon of pumpkin pie spice
One teaspoon of ground cinnamon
One teaspoon of pure vanilla extract
Instructions:
- Preheat the oven to 425° F.
Crust
- Crush the gluten-free cinnamon Chex cereal in a food processor until you have 2 cups.
- Add gluten-free Bisquick and chopped butter to the food processor. Process until the consistency of thick sand.
- Pour the Chex mixture into a bowl. Add the ice water and mix with your hands until a compact dough has formed. Refrigerate while making the pie filling.
Pumpkin Filling
- In a large bowl, beat eggs and sugar together.
- Add cinnamon, pumpkin pie spice, and vanilla and mix until thoroughly combined.
- Add pumpkin and mix until thoroughly combined.
- Stir in evaporated milk and mix until fully combined. Spray a 9-inch pie dish with gluten-free cooking spray.
- Press the dough into the pie dish.
- Using the middle rack, bake for 5 minutes at 425° F.
- Remove from the oven and pour pumpkin pie filling into the pie crust. Depending on your pie pan’s depth, you may have a little of the filling left over. I always pour it into a custard cup and bake it.
- Using the middle rack, bake for 15 minutes at 425° F, lower the heat to 350° F, and bake for an additional 40 to 50 minutes. Please watch your pie; if the crust is getting too brown for your liking, cover the crust edges with foil.
- Allow cooling before serving.
- Serve warm or cold with whipped cream. Enjoy!
- Once cooled, cover and refrigerate.
Hopefully you have a chance to try out one of these recipes in addition to your holiday classics. Have a happy Thanksgiving, Asbury, and a restful break.